
Appearance
CAS Authentication
Overview
CAS (Central Authentication Service) enables single sign-on (SSO) authentication, allowing users to log into Optimibi using a central authentication system. This guide provides step-by-step instructions for configuring CAS authentication in Optimibi.
1. Accessing CAS Configuration
- Log in to the Optimibi admin panel.
- Navigate to Settings from the left-side menu.
- Click on CAS under System Settings.
2. CAS Configuration Parameters
The following fields must be configured to enable CAS authentication:
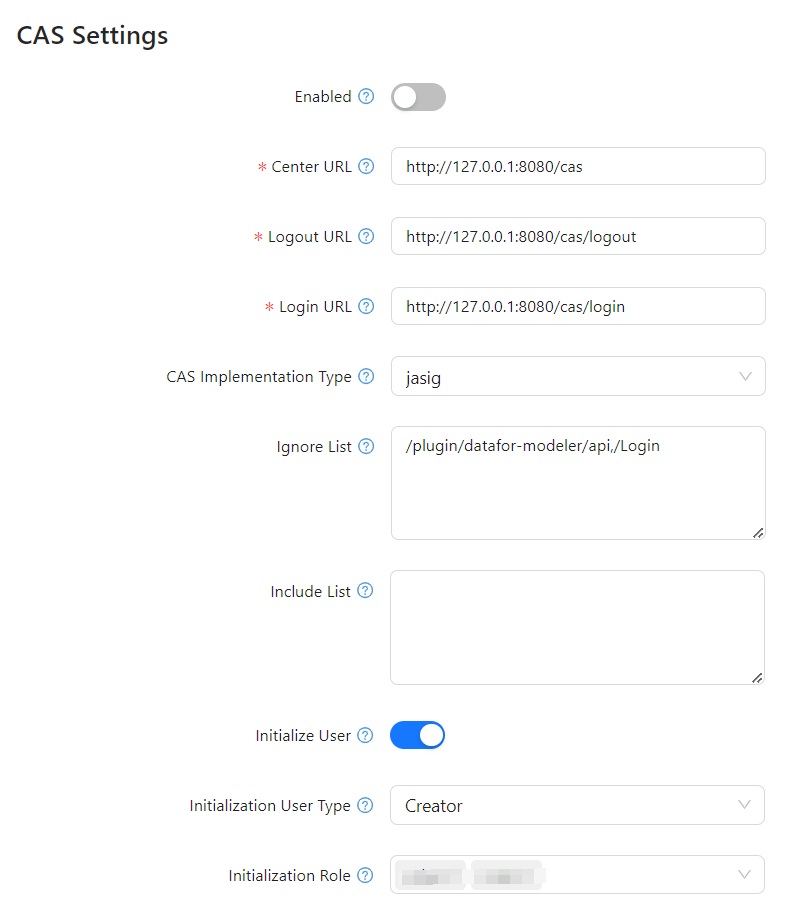
2.1 General Settings
| Parameter | Description |
|---|---|
| Enabled | Toggle this option to enable or disable CAS authentication in Optimibi. |
2.2 CAS Server Configuration
| Parameter | Description |
|---|---|
| Center URL | The main entry point of the CAS server. Example: http://127.0.0.1:8080/cas. |
| Login URL | The CAS login service URL, used to redirect unauthenticated users. Example: http://127.0.0.1:8080/cas/login. |
| Logout URL | The CAS logout service URL, used to sign out users. Example: http://127.0.0.1:8080/cas/logout. |
| CAS Implementation Type | Defines the CAS implementation type, such as jasig or another CAS-compatible protocol. |
2.3 Access Control
| Parameter | Description |
|---|---|
| Ignore List | A list of URLs that do not require CAS authentication. Multiple URLs should be separated by commas or new lines. |
| Include List | A list of URLs that require CAS authentication. Multiple URLs should be separated by commas or new lines. |
2.4 User Initialization Settings
| Parameter | Description |
|---|---|
| Initialize User | If enabled, new users will be automatically created in Optimibi upon first login. |
| Initialization User Type | Defines the default user type assigned to new users. Example: Creator. |
| Initialization Role | Specifies the default roles assigned to new users. |
3. Configuring CAS Authentication
Step 1: Enable CAS Authentication
- Toggle Enabled to activate CAS authentication.
Step 2: Configure CAS Server Settings
- Enter the Center URL (e.g.,
http://127.0.0.1:8080/cas). - Enter the Login URL (e.g.,
http://127.0.0.1:8080/cas/login). - Enter the Logout URL (e.g.,
http://127.0.0.1:8080/cas/logout). - Select CAS Implementation Type (e.g.,
jasig).
Step 3: Set Access Control Rules
- Add URLs to the Ignore List (URLs that bypass CAS authentication).
- Add URLs to the Include List (URLs that enforce CAS authentication).
Step 4: Configure User Initialization Preferences
- Enable Initialize User for automatic user creation.
- Define the Initialization User Type (e.g.,
Creator). - Assign Initialization Roles to newly created users.
4. Saving and Testing Configuration
- Click Save to apply the CAS settings.
- Perform a test login using CAS.
- If successful: The authentication flow should redirect to the Optimibi dashboard.
- If failed: Check the CAS server settings, login URL, and CAS implementation type.
5. Common Issues and Solutions
| Issue | Possible Cause | Solution |
|---|---|---|
| CAS authentication fails | Incorrect CAS settings | Verify Center URL, Login URL, and Logout URL. |
| User not created automatically | Auto-create user disabled | Enable Initialize User in settings. |
| CAS login loop | CAS session misconfiguration | Ensure the CAS session settings are correctly configured in the CAS server. |
Conclusion
By correctly configuring CAS authentication, Optimibi can integrate with a central authentication system, allowing seamless SSO login for users. Ensure all parameters are correctly set and perform test logins before deploying CAS authentication to end users.